#Manual Tape Cutting Machine
Explore tagged Tumblr posts
Visit Tumblr Blog
Explore Tumblr blogs with no restrictions, modern design and the best experience.
Last Seen Tumblr Blogs


Fun Fact
Average visit duration of Tumblr.com is 10 mins and 25 secs.
Text
All across the world, there is a rush by marketeers to sell you new appliances. The last couple decades of increasingly-shitty build quality have failed to plump their margins enough, so now they're trying the carrot. Now, when you buy a refrigerator, it can be connected to the internet. Some ovens need to be connected to the internet, or they can't cook a turkey. If you went back in time and explained this state of affairs to someone in the Victorian Era, they'd shoot you.
When did our civilization lose its inherent distrust of machines pretending to be human? Half of our most popular science-fiction franchises are about a glad-handing, smiling robot trying to steal or murder our children. Now we're going to let a refrigerator lock down access to nutrients for those same children, because it couldn't resolve DNS? No more of this, I say, which is why I've started a new business.
Here at Appliance Endumbinators, our crack team of computer scientists, computer engineers, and angry people with hammers will work hard to remove any semblance of "intelligence" from your appliances. If you bought a new barbecue and it refuses to work unless you use factory-authorized propane, we'll rip its circuit boards out and splice together the miles of wiring that make up its nervous system until it gives in. We'll find your car and use an angle grinder to cut out the part of its positronic brain that obeys speed limits. And just for laughs, we'll duct-tape a thrift store alarm clock to your coffee maker, so that it can still have your brew ready for breakfast.
Book us in now, before the machines have their way with you. Become the master of your own home, comfortable with the most idiotic of automatons as you watch your neighbours suffer with thousand-page manuals, helpless service calls, and outsourced below-minimum-wage customer support just to toast a waffle.
491 notes
·
View notes
Text
I can't believe I haven't posted much-
ANYHOW! I've been getting into Dandy's World, it's honestly a hyperfixation of mine now >:>
I've been working hard and I have Poppy, Shrimpo, Rodger (my main) and Tisha! I want to get Goob, but I've been getting 100 ichor per run as an average, so it's gonna take 30 runs or so, not to mention the Goob research I need, and I can barely find him- But! This won't stop me! I'm going to research, maybe I can get Teagan for solo runs and Sprout or Cosmo for runs with everyone! I really like stragetizing, so my strageties I'm thinking about using under the cut. Feel free to share your ideas or use these ones :>
So for Rodger, he's a bit slower so I'm trying to get 100% on Razzle n Dazzle for the ribbon spool, because the clown horn gives me 10%+ walk and run on odd numbered floors, and the ribbon spool does the same for even floors. I wanna work for the dog plush as well, just so I can work with more stamina.
Teagan and Sprout would be good with a coin pouch and using the tape cards, Cosmo would be good with cardboard armor, so he doesn't get jumped by Goob or Scraps. It'll be hard to get bandages and medkits with my luck-
If I play as Toodles for the higher stealth, I should look into the wrench and machine manual/magnifying glass, because she has 2 for her extraction speed
Dandy plush would be amazing for Teagan/Sprout! But that's going to be near impossible for me to get, I struggle getting to floor 8 as is, and Twisted Dandy pops up at earliest, the 6th floor. But, the work would be worth it!
I should look into getting one of the mains, not sure who. Any ideas? (Oh and maybe Yatta, cuz if I keep getting attacked, I'll go out with a bang ig :'>)
#dandys world#dandy's world#dw rodger#dandy's world rodger#dw toodles#dandy's world toodles#dw sprout#dw cosmo#dw teagan#dandy's world sprout#dandy's world cosmo#dandy's world teagan
10 notes
·
View notes
Text
This particular mend turned out to be MUCH more complex, involved, and fussy than I really ever expected it to be at the outset. That said, after all the work where I focused on taking my time to get things just so, I found out that I'm quite capable of handling larger projects like this!
First up, here, before starting, my partner Razz and I sat down, and went through our clothes with a careful eye. More and more of her pants in particular were in need of little fixes here and there, and I figured rather than going about it all piecemeal and in no particular order, not accomplishing the fixing of clothes she needs, we put them together into an order of "most wanted fixes" to "least pressing fixes".
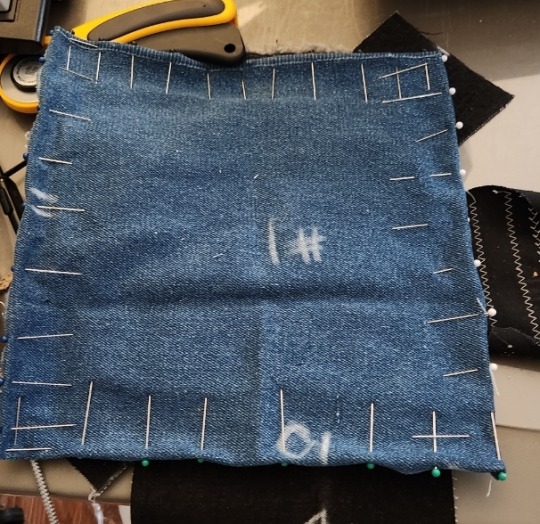
Once I had all that info, I settled in with a measuring tape, and got to identifying all the mends that needed to happen. For every piece that was more than, say, a few inches of rip, or of a shape that standard embroidery wouldn't cut it for a fix, I cut out a piece of patch fabric, with the intention of making use of these patches by doing sashiko mends.
Step 1: pin the hem of the patch down, initially hoping to run it through the sewing machine to have a nice hem! Sure, it was kinda fussy doing the quarter inch hems, since I hadn't really done this before, but it's not _too_ bad in hindsight!
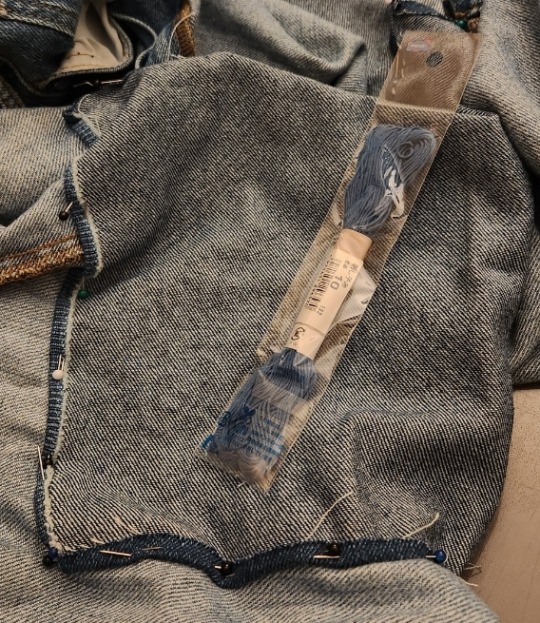
Step 2: Realize that the sewing machine foot you have on hand got mixed up with a family member's in a move, and begrudgingly realize you have to re-pin the hemmed patch directly to the jeans being mended. Grumble, grumble! Oh well, at least this light blue thread is going to be really cute on the jeans, so there's that.
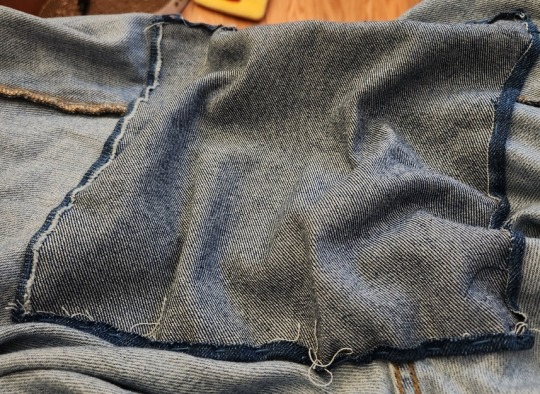
Step 3: stitch down the patch to the fabric, blissfully unaware that this big of a patch which interacts with the main seams four times like this is going to be a huge pain later!
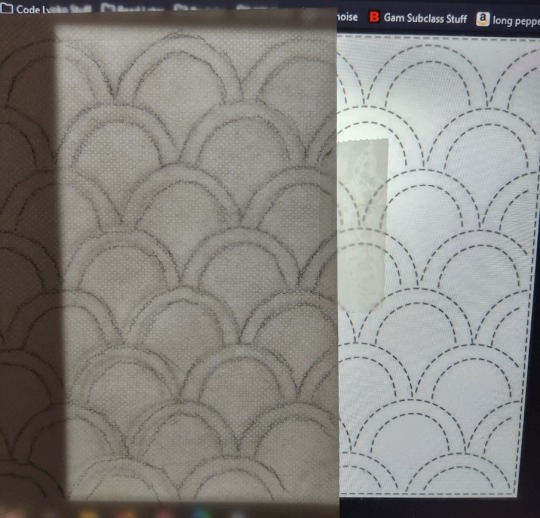
Step 4: with some clever use of tape and bumping the laptop brightness, make a tracing of the segaihana pattern onto the dissolvable backing. (I did realize later, mind you, that I could have just used something small and circular to draw this manually, but the tracing worked out just fine, so we take those!)
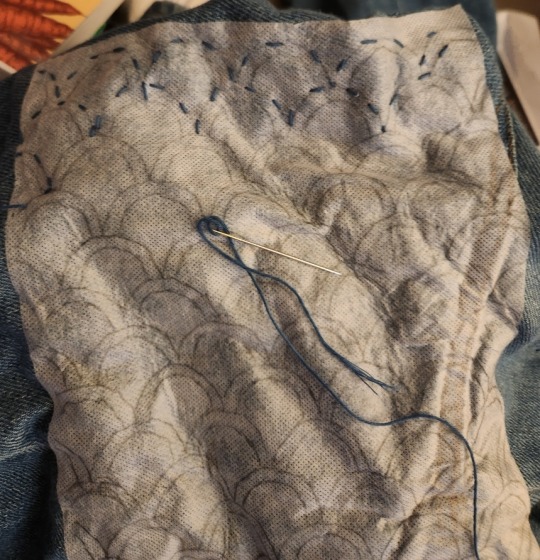
Step 5: get stitching, following the pattern on the backing! I get about this far before two things happen: first off, the sewing machine foot returned from family-home purgatory, and secondly, I realize that pushing this needle over and over with my bare hands is REALLY wearing out not only the muscles in my hands, but also thoroughly frustrating my skin, in the process.
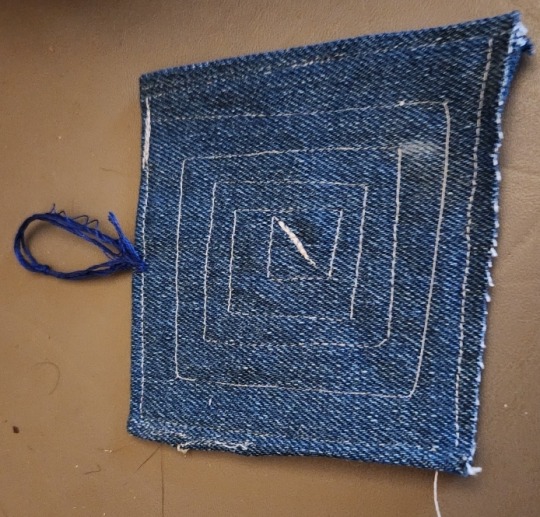
So, as a little test of the sewing machine, I made this little palm thimble! the loop of thread on the left there loops around my middle finger, and then the denim takes the brunt of pushing the needle, instead of my poor fingies!

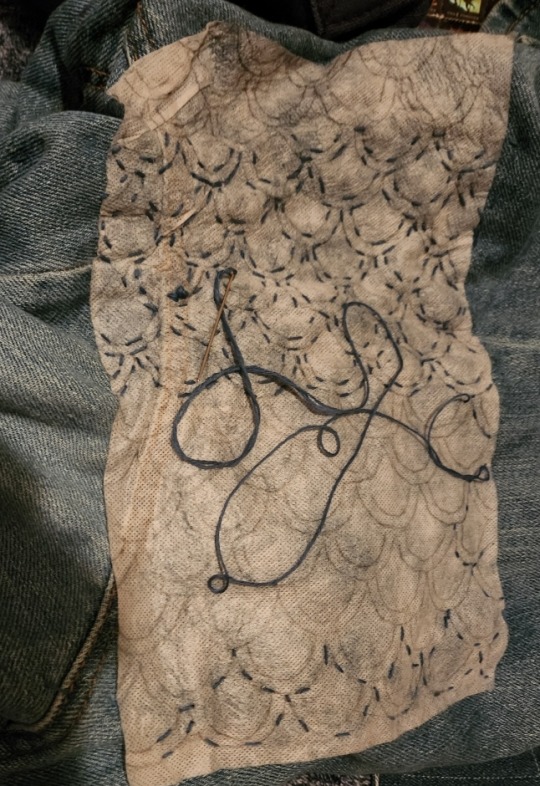
So, over the course of a few days, with a LOT of help from the palm thimble (some pieces even getting done on stream, go check out the vods: https://youtu.be/oeytUetT2Z0 and https://youtu.be/u6k-Yr4Vjn0) we get the first (major) panel done! Might not be super visible in these shots, but there is in fact a second piece to be stitched here!
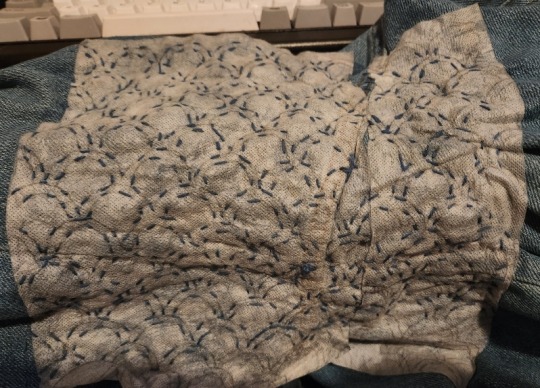
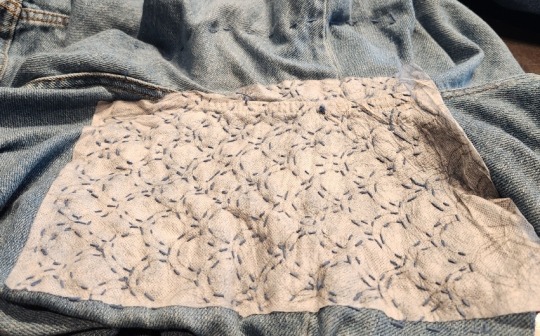
So, after yet more tracing (which took a good bit more fuss, since I had to align it with the previous panel!) we find ourselves at step 6: do the second batch of stitching! Overall, I actually really enjoyed the way this piece came together, the segaihana pattern is super pretty to look at. Plus, I learned a LOT in doing this one, the big thing being, if you're going to have trouble on both sides of a thigh of a pair of jeans, even if the damage is spread evenly on either side, break the patches up along the main seam. Sewing through the many layers of that denim is particularly taxing, especially when I'm struggling to nail the positioning of the stitches to carry on a nice pattern!
#solarpunk#slow fashion#sashiko#embroidery#hand embroidery#fiber arts#fabric art#visible mending#sashiko mending#denim mend#diy craft#hand sewing#handmade#sewing#mending#fix your clothes#queue.queue#a thousand words#sproutleboople#nesterian lifestylings
36 notes
·
View notes
Text
CNC development history and processing principles

CNC machine tools are also called Computerized Numerical Control (CNC for short). They are mechatronics products that use digital information to control machine tools. They record the relative position between the tool and the workpiece, the start and stop of the machine tool, the spindle speed change, the workpiece loosening and clamping, the tool selection, the start and stop of the cooling pump and other operations and sequence actions on the control medium with digital codes, and then send the digital information to the CNC device or computer, which will decode and calculate, issue instructions to control the machine tool servo system or other actuators, so that the machine tool can process the required workpiece.

1. The evolution of CNC technology: from mechanical gears to digital codes
The Beginning of Mechanical Control (late 19th century - 1940s)
The prototype of CNC technology can be traced back to the invention of mechanical automatic machine tools in the 19th century. In 1887, the cam-controlled lathe invented by American engineer Herman realized "programmed" processing for the first time by rotating cams to drive tool movement. Although this mechanical programming method is inefficient, it provides a key idea for subsequent CNC technology. During World War II, the surge in demand for military equipment accelerated the innovation of processing technology, but the processing capacity of traditional machine tools for complex parts had reached a bottleneck.
The electronic revolution (1950s-1970s)
After World War II, manufacturing industries mostly relied on manual operations. After workers understood the drawings, they manually operated machine tools to process parts. This way of producing products was costly, inefficient, and the quality was not guaranteed. In 1952, John Parsons' team at the Massachusetts Institute of Technology (MIT) developed the world's first CNC milling machine, which input instructions through punched paper tape, marking the official birth of CNC technology. The core breakthrough of this stage was "digital signals replacing mechanical transmission" - servo motors replaced gears and connecting rods, and code instructions replaced manual adjustments. In the 1960s, the popularity of integrated circuits reduced the size and cost of CNC systems. Japanese companies such as Fanuc launched commercial CNC equipment, and the automotive and aviation industries took the lead in introducing CNC production lines.
Integration of computer technology (1980s-2000s)
With the maturity of microprocessor and graphical interface technology, CNC entered the PC control era. In 1982, Siemens of Germany launched the first microprocessor-based CNC system Sinumerik 800, whose programming efficiency was 100 times higher than that of paper tape. The integration of CAD (computer-aided design) and CAM (computer-aided manufacturing) software allows engineers to directly convert 3D models into machining codes, and the machining accuracy of complex surfaces reaches the micron level. During this period, equipment such as five-axis linkage machining centers came into being, promoting the rapid development of mold manufacturing and medical device industries.
Intelligence and networking (21st century to present)
The Internet of Things and artificial intelligence technologies have given CNC machine tools new vitality. Modern CNC systems use sensors to monitor parameters such as cutting force and temperature in real time, and use machine learning to optimize processing paths. For example, the iSMART Factory solution of Japan's Mazak Company achieves intelligent scheduling of hundreds of machine tools through cloud collaboration. In 2023, the global CNC machine tool market size has exceeded US$80 billion, and China has become the largest manufacturing country with a production share of 31%.
2. CNC machining principles: How code drives steel
The essence of CNC technology is to convert the physical machining process into a control closed loop of digital signals. Its operation logic can be divided into three stages:
Geometric Modeling and Programming
After building a 3D model using CAD software such as UG and SolidWorks, CAM software “deconstructs” the model: automatically calculating parameters such as tool path, feed rate, spindle speed, and generating G code (such as G01 X100 Y200 F500 for linear interpolation to coordinates (100,200) and feed rate 500mm/min). Modern software can even simulate the material removal process and predict machining errors.
Numerical control system analysis and implementation
The "brain" of CNC machine tools - the numerical control system (such as Fanuc 30i, Siemens 840D) converts G codes into electrical pulse signals. Taking a three-axis milling machine as an example, the servo motors of the X/Y/Z axes receive pulse commands and convert rotary motion into linear displacement through ball screws, with a positioning accuracy of up to ±0.002mm. The closed-loop control system uses a grating ruler to feedback position errors in real time, forming a dynamic correction mechanism.
Multi-physics collaborative control
During the machining process, the machine tool needs to coordinate multiple parameters synchronously: the spindle motor drives the tool to rotate at a high speed of 20,000 rpm, the cooling system sprays atomized cutting fluid to reduce the temperature, and the tool changing robot completes the tool change within 0.5 seconds. For example, when machining titanium alloy blades, the system needs to dynamically adjust the cutting depth according to the hardness of the material to avoid tool chipping.


3. The future of CNC technology: cross-dimensional breakthroughs and industrial transformation
Currently, CNC technology is facing three major trends:
Combined: Turning and milling machine tools can complete turning, milling, grinding and other processes on one device, reducing clamping time by 90%;
Additive-subtractive integration: Germany's DMG MORI's LASERTEC series machine tools combine 3D printing and CNC finishing to directly manufacture aerospace engine combustion chambers;
Digital Twin: By using a virtual machine tool to simulate the actual machining process, China's Shenyang Machine Tool's i5 system has increased debugging efficiency by 70%.


From the meshing of mechanical gears to the flow of digital signals, CNC technology has rewritten the underlying logic of the manufacturing industry in 70 years. It is not only an upgrade of machine tools, but also a leap in the ability of humans to transform abstract thinking into physical entities. In the new track of intelligent manufacturing, CNC technology will continue to break through the limits of materials, precision and efficiency, and write a new chapter for industrial civilization.
#prototype machining#cnc machining#precision machining#prototyping#rapid prototyping#machining parts
2 notes
·
View notes
Text
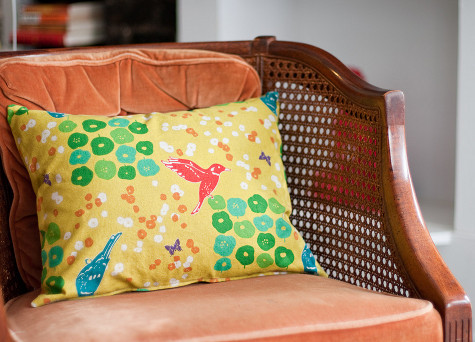
DIY Zippered Throw Pillows
Project by Brett Bara:
Throw pillows are another fantastic way to incorporate cute textiles and DIY flair into your home without a great investment of time or money. If you’ve ever gone into a fabric store and wanted to buy everything because it’s just all so gorgeous, then pillows are a great way to put those fabrics to work in your decor. Bold or loud prints that would be too much used in large scale (like in curtains) can be just right for a little pillow pop on a sofa or bed.
I’m going to show you how to make a zippered pillow cover, which is easier than it sounds, I promise. It looks super-professional AND has the added bonus of being easily changeable—I love the idea of making tons of different pillow covers and just swapping them out whenever you want a little change in a room.
The best part? You can make the pillow shown here in less than an hour! –Brett Bara
A Word on Zippers
Ok, I know you’re not going to believe me when I say this, but installing a zipper is REALLY EASY. (There are many ways to install a zipper —some more refined than others—the method I’m sharing here is basic and very simple!) BUT, if installing a zipper feels like it’s just too much, don’t give up. I’ll give alternate instructions at the end for how to make a pillow without a zipper. Everybody happy now? Let’s get started!
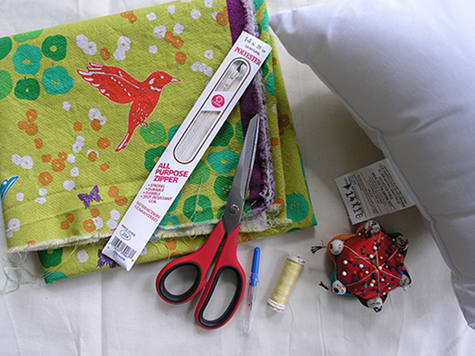
What You’ll Need
½ yard fabric (if your pillow is larger than 16”, you’ll need more fabric)
1 pillow form (buy this at a craft store or upholstery shop)
1 all-purpose zipper about 4” shorter than the edge of your pillow
Thread to match your fabric
Seam ripper
Sharp scissors
Straight pins
Tape Measure
Sewing machine
Zipper foot attachment for your sewing machine
Selecting and Preparing Fabric
Almost any type of fabric can be used for a throw pillow, but for beginners I recommend starting with medium-weight fabrics that are smooth in texture, like cottons or cotton-linen blends.
I’m using a Japanese print from the fantastic Etsuko Furuya for Echino line.
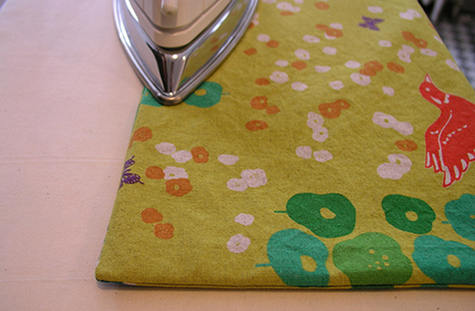
If your fabric is machine-washable, wash and dry it before sewing. This will pre-shrink the fabric, which is necessary to prevent the seams from puckering during future washings.
Finally, thoroughly iron the fabric before beginning.
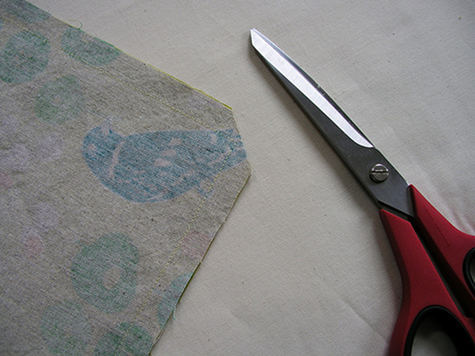
Cutting
Cut two pieces of fabric that are the size of your pillow form plus 1” in length and 1” in width. So, if your pillow form is 12×16”, you’ll need two pieces of fabric that are 13×17”. This allows for ½” seam allowance on all seams.
Installing the Zipper
Place both pieces of fabric together with the right sides of the fabric facing each other and all corners aligned. (Be sure to situate both pieces so that the print pattern is facing in the same direction.)
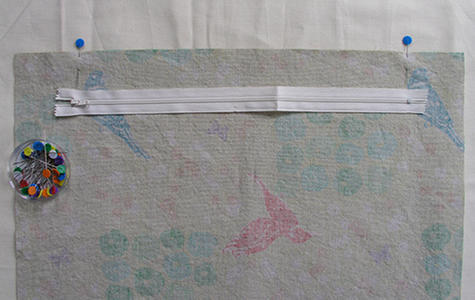
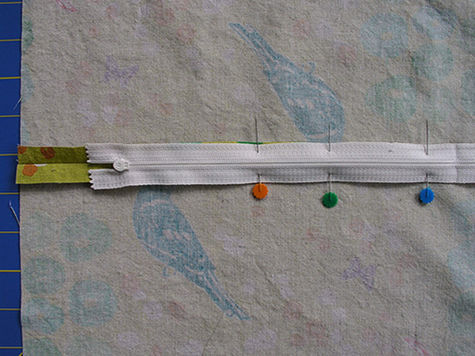
Center the zipper along what will be the bottom edge of the pillow, since you’ll want the zipper to be on the bottom edge of the finished pillow. (Here, my fabric is flipped with the bottom edge facing up, just to make it easier to work with). Place a pin near each end of the zipper, just INSIDE the metal stops at each end.
With a ½” seam allowance, sew the two segments on the outside of each pin. (This should be a short space of just a couple inches between the pins and the corners of the fabric.) Reinforce these seams by back-stitching at the beginning and end of each seam.
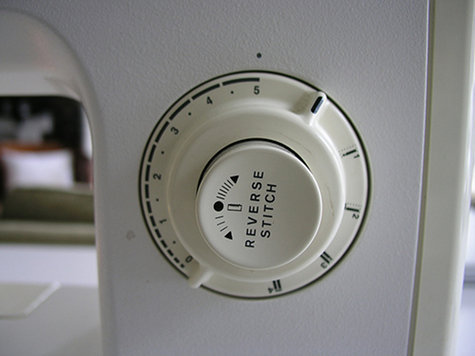
Next, change the stitch length on your machine to the longest length, which will allow you to baste the next seam. (Basting is sewing a long stitch which will later be removed; the long, loose quality of a basted stitch makes them easier to remove than regular stitches) With the stitch length set to long, simply sew the space in between the two short seams you just made. (Do not back-stitch to reinforce basted seams.)

Iron this seam open.

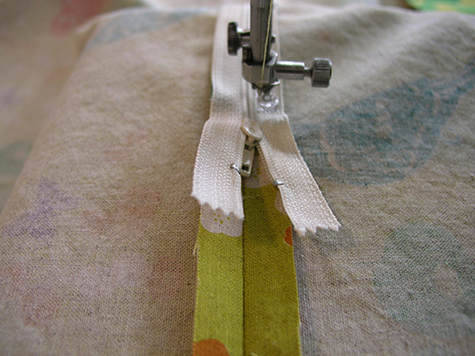
With the wrong side of the fabric facing up, place the zipper right-side down, aligning the zipper teeth directly over the seam. Pin it in place.
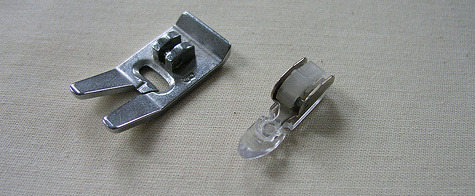
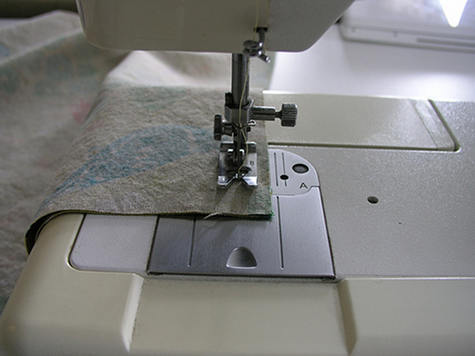
Change your machine’s presser foot to the zipper foot. Consult your manual for help with this if necessary; usually the feet snap off and on rather easily.
A zipper foot (shown here on the right) can be different for every sewing machine model, but it often looks like half of a standard presser foot (shown on the left). It allows you to sew right along the edge of the zipper teeth neatly and easily. The zipper foot has a little sliding part that changes it to a right or left position, so just slide it accordingly depending on whether you are sewing the right or left side of the zipper. (That means you have to pop off the zipper foot after sewing the right-side seam, slide the zipper foot thingie over to the left position, then pop the foot back on the machine. All this only takes a second once you get the hang of it!)
Note: Be sure your stitch length is back to normal length for the remainder of the sewing. Starting at the bottom of the zipper on the right side, with the zipper foot in the right-side position, sew down the side of the zipper. When you get near the end, stop the machine. Leave the needle in the work, but raise the foot, and gently move the zipper pull back behind the needle. Then lower the foot again and sew to the end of the zipper. Backstitch at the end of this seam.
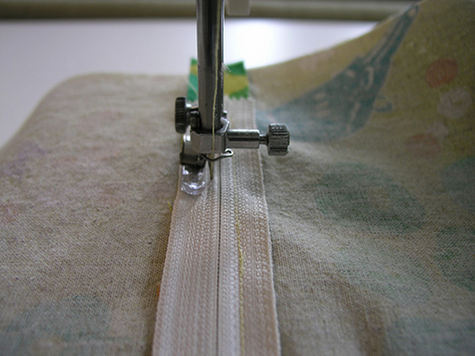
Next, change the zipper foot to the left position, and repeat this process on the left.
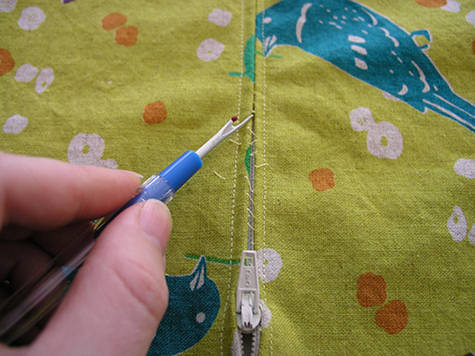
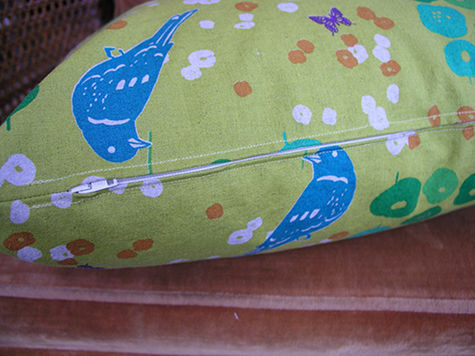
And your zipper is installed! (That wasn’t so bad, right?) The seam is still basted closed, so from the right side, use the seam ripper to gently remove the basted stitches. (They’ll pop out really easily; just pick out any remaining thread pieces that are left dangling.)
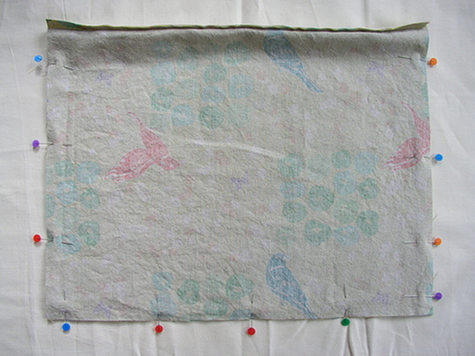
Change back to the standard presser foot. Fold the two pillow halves so that they are aligned with right sides facing each other and all corners and edges meeting. Pin in place. Sew around all three sides with a ½” seam allowance. (The fourth side, of course, is the side with the zipper installed.)
Here’s how to sew around the corners: when you reach each corner, leave the needle in the fabric and raise the presser foot, then pivot the fabric 90 degrees, lower the presser foot again, and continue sewing.
Clip the fabric at the corners. (Removing the excess fabric here helps give you a nice, sharp corner once you turn the pillow inside out.)
Turn the pillow cover inside out, ironing the seams flat.
Insert the pillow form, and you’re done!
NOW FOR THE NO-ZIPPER PART
If you’d rather skip the zip, just use your sewing machine to sew the two pieces of fabric together around three edges, plus about 2” on each side of the fourth edge. Clip the corners and turn right-side out, iron the seam flat, then insert the pillow form. Using a needle and thread, hand-sew the opening closed. Of course, this pillow cover won’t be removable, but it will still be lovely!
18 notes
·
View notes
Text
What is Bagging Machine? - Payper India
A bagging machine is a type of industrial equipment used to automate the process of filling and sealing bags with various products. These machines are widely used in different industries, such as food, pharmaceuticals, chemicals, and agriculture, to efficiently package goods ranging from powders and granules to liquids and solids.

Image Ref : What is Bagging Machine — Payper India
Key Functions of Bagging Machines:
Filling: The machine accurately dispenses a pre-set amount of product into each bag. This can be achieved through various mechanisms, such as volumetric fillers, auger fillers, or weigh scales, depending on the nature of the product being packaged. Click here for Ref : www.payperindia.com
Sealing: After the bag is filled, the machine seals it to ensure the product is contained and protected. Sealing methods can include heat sealing, ultrasonic sealing, or using adhesive tapes, depending on the bag material and the product requirements. Click here for Ref : www.payperindia.com
Cutting/Trimming: Some bagging machines also trim excess material from the sealed bags to ensure a neat and uniform appearance. Click here for Ref : www.payperindia.com
Types of Bagging Machines:
Valve Bagging Machines: Designed for heavy-duty products such as cement, sand, or chemicals, these machines fill bags through a valve and then seal the valve to prevent leakage. Click here for Ref : www.payperindia.com
Open-Mouth Bagging Machines: Used for bulk products like grains, animal feed, or fertilizers, these machines fill pre-made bags that are manually or automatically positioned under the filling spout. Click here for Ref : www.payperindia.com
FIBC- Jumbo Bagging Machine: A jumbo bagging machine, or bulk bag filling machine, is designed to fill large bags (500–2000 kg) with bulk materials.
Why Payper ?
Payper India develops and manufactures bagging machines for all types of bulk solids such as powders or granulates. Other important product lines are palletizers and complete lines.
Our customers come from many different sectors, e.g., Chemical Industry, Agro-food Industry, Mining Industry and Building Industry. Payper India offers a comprehensive solution for each sector.
No need or demand is too small neither too big for us. We supply bagging machines for smaller industries with low volume requirements. We also provide complete turnkey projects for customers with high demands as to capacity and speed.
What matters to us is that our customer is comfortable and satisfied with the solution we have developed for them
Visit Payper at — https://www.payperindia.com/
Business LinkedIn -http://bit.ly/45Y1xMQ
Twitter — https://twitter.com/PayperIndia
Instagram — https://www.instagram.com/payperindia/
#payper#payperindia#baggingmachines#manufacturer#industry#machinery#robotics#palletisers#jumbobaggingmachine
2 notes
·
View notes
Text
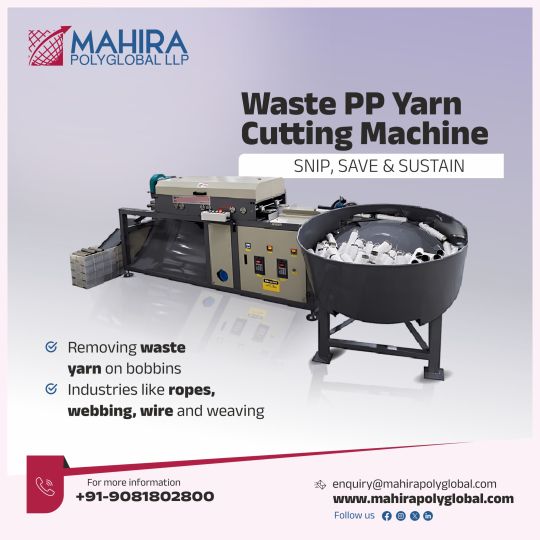
Waste PP Yarn Cutting Machine
The newest and best automatic PP/HDPE cheese pipe cleaning machine was created in response to industry demand and rising labor costs. It replaces the labor-intensive, manual process of cutting tapes with scissors, a knife cutter, an electric hot wire, and a blade. This machine for cleaning PP/HDPE cheese pipes automatically cuts through yarns and tapes, separating the cheese pipes with great ease and collecting waste and cheese pipes in different boxes. Bobbins are not harmed or impacted by this cutting operation. These procedures are all completed quickly.
For more information contact us : +91- 9081802800, e-mail : [email protected]
#wastepp#yarncutting#recyclingmachine#polypropylene#textilewaste#recyclingequipment#sustainablemanufacturing#wastemanagement#ecommerce#commercial#branding#marketing#sales
1 note
·
View note
Text
Pressed with Personality: DIY Letterpress and Embossed Cards
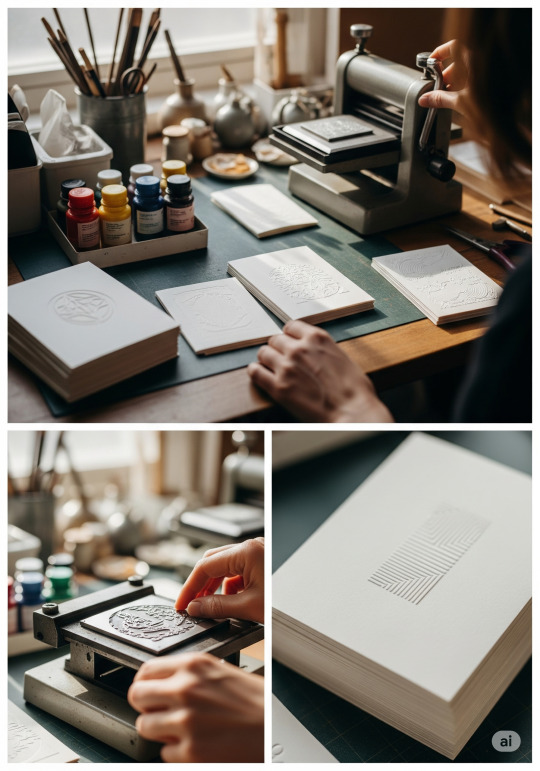
You’ve ironed, etched, stamped, stitched, and painted your way through this crafty jungle. But now, dear artisan, it's time to press your point—literally. Welcome to the beautifully tactile world of letterpress and embossing.
These techniques have been wooing paper lovers since the Renaissance, and they’re still the gold standard for elegance. Whether you’re crafting wedding invitations, thank-you notes, or business cards with bite—today’s projects are all about giving typography some serious texture.
🖨️ What Is Letterpress & Embossing?
Let’s define our new playthings:
Letterpress involves pressing inked, raised type into paper for a deep, crisp print.
Embossing creates a raised design (no ink necessary!) by pushing paper between two dies—one raised, one recessed.
Debossing is the reverse of embossing: it presses inward for a sunken-in effect.
For home crafters, we’re keeping it manual and DIY-friendly (read: no $20K letterpress machines today, folks).
🧰 What You’ll Need:
Blank cards or thick paper (at least 200gsm)
Embossing folder or DIY embossing stencil
Embossing tool (or blunt stylus)
Letter stamps or letterpress plates (can be 3D printed!)
Optional: Die-cutting/embossing machine (e.g. Sizzix, Cricut Cuttlebug)
Ink pad (for letterpress effect)
Washi tape, ruler, pencil, and a steady hand
🔠 Typography Tips for Pressed Crafts
Serif fonts shine here—think traditional, classy, and deeply readable.
All-caps serif gives authority to invitations and formal cards.
Avoid hyper-thin fonts—they don’t press well and may look like faint bruises on paper.
Bold script fonts can add elegance when embossed.
🧭 Step-by-Step: Handcrafted Press & Emboss Projects
✉️ Embossed Greeting Card
Sketch Your Layout Lightly draw guide lines in pencil.
Place Your Paper in Folder Or use a DIY stencil (cut from cardboard) for single words or initials.
Rub with Embossing Tool Trace the stencil edges with pressure—work slowly for smooth outlines.
Flip & Admire The reverse side should show a raised effect. Simple, clean, chic.
🖋️ Letterpress Effect (Without a Machine)
Ink Your Letters Using alphabet rubber stamps or carved wood blocks.
Align & Press Firmly Onto cardstock. Apply even pressure—use a book on top if needed.
Optional Deboss Touch While ink is still fresh, press a clean stylus around the edges of the letter to add depth.
🧠 Unique Fact of the Day:
The first movable type letterpress dates back to the 15th century, invented by Johannes Gutenberg. This single invention sparked the modern printing revolution—and yet here you are, doing it for fun, with ink-stained fingers and homemade stencils. The full-circle moment is chef’s kiss.
💌 Typography-Based Project Ideas
Thank-You Cards: Embossed initials or words like “GRATEFUL” or “YOU ROCK.”
Wedding Invitations: Classic serif fonts, letterpress-inked dates.
Quote Cards: Letterpress a motivational phrase, frame it, or slip it into a gift.
Mini Business Cards: Debossed logos + your name in clean serif = classy AF.
Gift Tags: Use small stencils to emboss monograms or festive words like “JOY” or “LOVE.”
✨ Crafting Wisdom:
For embossing: dampen paper very slightly—a light mist can help it mold better.
For letterpress: always test your ink pad and spacing on scrap paper.
Don’t be afraid to combine embossed designs with ink for mixed-media style.
🧪 Experiment Ideas:
Use metallic ink for a luxe letterpress.
Try blind embossing—no ink, just texture—for an ultra-minimalist vibe.
Pair embossed words with hand-lettered embellishments for a “hybrid typography” look.
🔤 Font Pick of the Day:
Try Playfair Display, Cormorant Garamond, or Lora for elegant serif type. For something whimsical, try Bodoni Moda or Libre Baskerville—they look amazing when pressed!
https://letterhanna.com/pressed-with-personality-diy-letterpress-and-embossed-cards/
0 notes
Text
Strapping & Taping Machine: The Ultimate Guide for Packaging Efficiency
In today’s fast-paced industrial world, businesses are continually looking for ways to optimize packaging processes. One of the most essential tools for improving productivity, ensuring safety, and minimizing packaging errors is the Strapping & Taping Machine. Whether you're managing logistics, manufacturing, or distribution, understanding these machines can significantly enhance operational efficiency.
This article explores everything you need to know about strapping and taping machines—how they work, their benefits, types, applications, and how to choose the best solution for your needs—all crafted in line with Google's 2025 SEO algorithm guidelines.
What is a Strapping & Taping Machine?
A Strapping & Taping Machine is a packaging device designed to secure packages using either plastic or steel straps (strapping) or pressure-sensitive adhesive tape (taping). These machines automate the packaging process, providing uniform, secure, and professional finishes that help in handling and transportation.
While strapping machines bind products with durable straps, taping machines seal boxes or cartons with tape. The combination of both ensures complete package integrity.
Types of Strapping & Taping Machines
1. Automatic Strapping Machines
These are ideal for high-volume packaging lines. They offer fast and consistent strapping and are integrated with conveyors for a seamless workflow.
2. Semi-Automatic Strapping Machines
Perfect for medium-sized operations, these require manual product positioning but automate the strapping process.
3. Manual Strapping Tools
Cost-effective and portable, these tools are suitable for low-volume packaging needs.
4. Carton Sealing Machines (Taping Machines)
These are specialized for sealing boxes using BOPP tape. They come in automatic and semi-automatic variants to match different production scales.
5. Combination Systems
Advanced solutions that combine both strapping and taping functions, perfect for operations that need both processes in one go.
Key Benefits of Strapping & Taping Machines
✅ Enhanced Packaging Speed
These machines significantly reduce the time taken to strap or tape packages, enabling faster throughput.
✅ Consistent Seal Quality
Automation ensures uniformity, reducing human error and enhancing the aesthetic and structural integrity of packages.
✅ Labor Cost Reduction
With minimal human intervention, businesses can cut down on labor costs and allocate human resources to other critical areas.
✅ Improved Safety
Machines provide a safer packaging process, especially for heavy-duty applications, by minimizing manual handling.
✅ Better Load Securing
Strapping machines tightly secure loads, reducing damage during transit and storage.
Applications of Strapping & Taping Machines
E-commerce Fulfillment Centers
Logistics & Warehousing
Food & Beverage Packaging
Pharmaceuticals & Chemicals
Electronics & Appliances
Automotive Parts & Components
These machines are versatile and fit for various industries where efficient and secure packaging is essential.
How to Choose the Right Strapping & Taping Machine
🔍 Assess Packaging Volume
High-volume operations benefit from fully automatic systems, while small businesses may find semi-automatic or manual tools more suitable.
🔍 Material Type
Consider whether your products require plastic strapping, steel strapping, or different tape grades.
🔍 Box Dimensions
Select machines that can accommodate the range of package sizes you deal with regularly.
🔍 Space Availability
Evaluate your workspace and choose compact or modular machines if floor space is limited.
🔍 Maintenance & Support
Choose a machine that's easy to maintain and supported by good technical documentation or remote diagnostics.
Latest Trends in Strapping & Taping Machines (2025)
IoT Integration: Modern machines are now equipped with IoT sensors for real-time monitoring and predictive maintenance.
Eco-Friendly Tapes & Straps: There is a growing shift towards biodegradable and recyclable packaging materials.
Smart Automation: Integration with conveyor systems and automated guided vehicles (AGVs) is becoming more common.
Energy Efficiency: New models are designed to consume less power while delivering higher output.
SEO Tips: Why Target the Keyword "Strapping & Taping Machine"?
Targeting the keyword Strapping & Taping Machine aligns with buyer intent, especially for B2B decision-makers searching for industrial packaging solutions. Including variations such as automatic strapping machine, carton taping machine, packaging automation tools, and industrial taping systems can help broaden your SEO reach while maintaining relevance.
0 notes
Text
The Future of Interior Protection: Smart Barriers and High-Tech Dust Control
As technology continues to transform the construction and renovation industries, Interior Protection is also undergoing a quiet revolution. What was once a simple tarp-and-tape job is evolving into a sophisticated system of smart barriers, high-efficiency filters, and real-time air quality monitoring.
In this blog, we’ll explore the exciting future of Interior Protection—from intelligent containment systems to cutting-edge dust control technologies—and why it matters more than ever for safety, sustainability, and regulatory compliance.
Why Interior Protection Is More Important Than Ever
Construction and renovation projects don’t always happen in empty buildings. Work often takes place in:
Active retail spaces
Operating healthcare facilities
Food manufacturing plants
Occupied office environments
In these settings, Interior Protection isn't optional—it's essential. It safeguards workers, equipment, and building occupants from:
Airborne dust and debris
Contaminants like mold or asbestos
Cross-contamination in sensitive environments
Damage to surfaces, ceilings, or inventory
The demand for more effective and intelligent protection systems is fueling innovation in the industry.
Smart Barriers: The Next Generation of Containment
Traditional barriers are being replaced—or at least upgraded—with smart interior protection systems that offer automation, adaptability, and monitoring.
Key Features of Smart Barriers:
Modular Design: Easily reconfigured on-site as the project evolves.
Sensor Integration: Embedded sensors can track air quality, temperature, and pressure differentials.
Automated Sealing Mechanisms: Ensure perfect containment without constant manual adjustment.
Connectivity: Systems that send alerts if containment is breached or conditions change.
These smart barriers are especially valuable in hospitals, clean rooms, and food processing plants where maintaining strict environmental control is crucial.
High-Tech Dust Control Systems
Dust isn't just a nuisance—it’s a serious health hazard and regulatory concern. New dust control technologies are setting higher standards for interior protection.
Innovative Dust Control Methods Include:
HEPA-filtered Negative Air Machines: Capture 99.97% of dust particles and maintain negative pressure to contain pollutants.
Electrostatic Dust Suppression: Uses static charge to draw particles out of the air.
Real-Time Air Quality Monitors: Measure and log particulate levels to prove compliance and performance.
Portable Dust Containment Units: Self-contained enclosures with built-in air filtration and mobility.
Together, these technologies make Interior Protection more effective, especially in sensitive or regulated environments.
Sustainability Meets Interior Protection
With growing pressure for eco-friendly practices in construction, the future of Interior Protection is also greener. Innovations include:
Reusable containment panels instead of single-use plastic sheeting
Low-VOC adhesives and sealants for dust walls
Energy-efficient air scrubbers
Digitally monitored systems that reduce waste by alerting teams only when maintenance or replacement is needed
These sustainable practices help reduce landfill waste and carbon footprint—while keeping projects safe and compliant.
Looking Ahead: What to Expect
Here’s where Interior Protection is headed in the next few years:
AI-powered predictive maintenance for containment systems
Smartphone-connected sensors for remote monitoring
Integration with Building Management Systems (BMS)
Widespread use of prefabricated, ready-to-install protection kits
As the line between technology and construction continues to blur, Interior Protection will become smarter, safer, and more seamless than ever before.
Conclusion
The future of Interior Protection is not just about dust control—it's about intelligent systems that enhance safety, efficiency, and environmental responsibility. As regulations tighten and expectations rise, investing in high-tech, smart barrier systems will become a competitive advantage for contractors, property managers, and facility operators alike.
0 notes
Text
Unlock What’s Rightfully Yours: The Smarter Way to Recover Unclaimed Assets
In today’s fast-paced financial world, millions of dollars in unclaimed assets go unnoticed, locked away in forgotten bank accounts, dormant investments, uncashed checks, and more. For organizations, administrators, fiduciaries, and even governments, these hidden funds can represent significant unrealized value. But tracking them down through traditional methods can be a frustrating maze of red tape and outdated systems.
That’s where AssetFynd comes in.
Smarter Searches. Faster Results.
At AssetFynd, we believe that reclaiming what’s yours shouldn’t be a complicated guessing game. That’s why we’ve revolutionized the way unclaimed property is recovered. Our proprietary high-speed algorithms and intelligent search capabilities do in seconds what manual searches can take weeks to achieve.
No more sifting through dozens of government websites or outdated databases. AssetFynd uses AI and machine learning to connect the dots across hundreds of millions of global asset records—accurately, efficiently, and with minimal effort on your part.
Bridging the Gap Between Lost Assets and Legal Owners
Using cutting-edge technology, we close the loop between lost financial property and its rightful owner. Whether you're a corporation trying to balance your books, a trustee locating dormant funds, or a charity retrieving legacy gifts, AssetFynd is your dedicated partner in asset recovery.
Our platform is designed for:
Corporations seeking to reclaim overlooked revenue
Trustees and fiduciaries managing estates and trusts
Charities recovering unallocated donations
Governments managing unclaimed funds
Administrators streamlining asset audits
Global Reach. Local Precision.
AssetFynd offers a truly global solution with the precision and reliability needed to meet local legal and regulatory standards. Our extensive database includes both domestic and international asset records—giving you the confidence to search once and search right.
Why Choose AssetFynd?
Speed: Our intelligent algorithms cut down search times dramatically.
Accuracy: AI-powered matching ensures results are relevant and reliable.
Convenience: One platform. Billions of records. Unlimited potential.
Support: We’re with you every step of the way, from discovery to claim.
Reclaim More, Stress Less
Don’t let forgotten funds stay forgotten. Join the growing list of institutions, professionals, and organizations who are turning to AssetFynd for the most effective way to recover what’s rightfully theirs.
Let technology do the heavy lifting—start your asset recovery journey with AssetFynd today.
0 notes
Text
Invisible Strength, Visible Quality: What Makes a Gypsum Board Brand Truly Stand Out
Step into a finished interior — clean ceiling lines, crisp partitions, sharp corners. Now look closer. What’s making that finish possible?
Not the paint. Not the lighting. It’s the gypsum board underneath — invisible to the client, but everything to the execution.
That’s why industry leaders don’t just buy boards by size or price. They choose boards by performance, reliability, and long-term finish integrity.
And when quality, consistency, and nationwide supply come together, one name consistently rises: Buildwell — regarded by professionals as the Best Gypsum Board Brand in India for projects where the finish must match the promise.

“Invisible Strength” – Why the Board Behind the Paint Defines the Finish You See
A perfect finish starts long before primer hits the surface. It starts with the right core, the right edges, the right paper, and the right fit.
That’s where Buildwell makes its mark — by delivering a gypsum board that:
Cuts clean
Fixes fast
Holds strong
Finishes smooth
And does it consistently, across cities, climates, and construction styles.
What Makes Buildwell the Best Gypsum Board Brand in India?
Let’s break it down based on real-site impact:
✅ 1. Strong Paper Lamination for Seamless Jointing
Buildwell boards use high-strength face paper bonded with precision to the gypsum core, giving you:
Fewer jointing compound failures
Stronger tape grip
Less sanding after compound application
Cleaner final paint appearance
No joint bubbling. No shadow lines under downlights.
✅ 2. Crack-Resistant Core for Long-Term Stability
The internal composition is engineered to minimize expansion/contraction due to climate, ensuring:
No edge cracks
No board warping
Better alignment across large ceilings or partition grids
Especially critical for sites exposed to both dry heat and post-install AC cooling.
✅ 3. Clean Cutting & Easy Fixing
Buildwell gypsum boards respond well to manual and machine cutting, producing:
Smooth edges
Minimal dust
Easy alignment during fitting
Better screw holding capacity
Less material loss. Fewer rejected pieces.
✅ 4. Available in Full Range of Types & Sizes
Whatever your need — Buildwell has it:
Regular Boards – for dry interiors and standard ceiling work
Moisture-Resistant (MR) Boards – for kitchens, bathrooms, service ducts
Fire-Retardant (FR) Boards – for safety zones, shafts, fire-compliant walls
Available in standard 12.5mm thickness with multiple sizes as per BOQ.
One brand, all variants = faster approvals, fewer site-level changes.
✅ 5. Perfect Match with Buildwell System Products
Buildwell boards are designed to integrate with:
Buildwell jointing compound
Drywall screws
Metal framing
Ceiling tiles
Gypsum plaster and bond
Using everything from the same brand gives your project team complete material compatibility — eliminating site adjustments and post-handover surprises.
Where Buildwell Boards Make the Biggest Difference
🏢 Corporate Fit-Outs
Cleaner ceiling finishes, stronger edge joints, fewer complaints during walkthrough.
🏘️ Group Housing
Standardized finish quality across flats and towers with less material loss floor-by-floor.
🏫 Institutions & Schools
Impact-resistant performance and easy installation across partition-heavy interiors.
🏥 Healthcare Spaces
Smooth finish, MR options, and zero surface cracking for hygienic interiors.
🏬 Retail Spaces
Faster workability and better stability under accent lighting.
In every case, Buildwell ensures the gypsum board does what it’s supposed to: disappear from view, but hold everything together.
Why Contractors Choose Buildwell Again and Again
Boards that don’t crack while cutting
No delays due to board warping or misalignment
Consistent supply across project zones
Finish support and compatibility across the entire ceiling system
Minimal patchwork required during final handover
That’s why it’s considered the best gypsum board brand in India — because it helps contractors deliver perfect results with less pressure.
Final Word: The Best Interiors Start with the Right Board
Your painter may get the praise. Your designer may get the glory. But your gypsum board? It holds everything in place — quietly, reliably, invisibly.
Buildwell doesn’t just sell boards. It delivers project confidence.
That’s what makes it the best gypsum board brand in India — for homes, hotels, hospitals, or head offices that need finishes to last.
🌐Explore Ceiling Products at Buildwell.in
📧 Email: [email protected] 📲 WhatsApp: 7900336699 📞 Toll-Free: 18001028031
0 notes
Text
POF Shrink Film by Triveni Packaging – Flexible, Clear & Reliable Packaging for Everyday Products

Packaging is more than just covering a product—it's about showcasing your brand’s identity, preserving quality, and making that all-important first impression count. Whether you're sealing bakery goods, electronic accessories, or retail bundles, your packaging needs to look great, perform well, and stay reliable. This is where POF shrink film shines—and why countless businesses across the UAE trust Triveni Packaging Trading Co. LLC for their packaging needs.
For over three decades, Triveni Packaging has partnered with businesses in the UAE, helping them improve their packaging operations with durable, professional-grade materials. As a respected packaging materials supplier and packaging machine supplier, we take pride in offering high-quality POF shrink film that delivers on all fronts: clarity, strength, and versatility.
Why UAE Businesses Are Choosing POF Shrink Film
Not all shrink films are made equal. Traditional materials can be brittle or cloudy, but POF shrink film stands out for its clear finish, superior strength, and food-safe properties. It wraps tightly around your product, creating a smooth and secure seal that won’t split or degrade during transport. It’s even safe for direct contact with food—ideal for anything from fresh produce to frozen entrees.
Companies love POF because it helps cut down on waste, reduces tape use, and creates a professional presentation. Customers appreciate it for its neat, tamper-evident look that builds trust in the product. In short, it’s a win-win solution.
And because our POF shrink film works seamlessly on manual, semi-automatic, and fully automatic machines, it fits easily into any operation—whether you're a small startup or a large production facility.
A Flexible Fit Across Industries
One of the key reasons POF shrink film is so widely adopted across the UAE is its versatility. This versatile packaging solution is trusted across a wide variety of industries in the UAE, thanks to its adaptability and consistent performance:
Food and beverage – For neatly wrapping fruits, baked items, or frozen meals.
Retail and cosmetics – Used for attractive product bundles, skincare sets, and electronics.
Healthcare and pharmaceuticals – Perfect for packaging hygiene products, medical kits, or over-the-counter items.
Logistics and e-commerce – Helps group products together and ensures safe delivery to customers.
With its high-clarity finish and durable protection, our POF shrink film not only elevates the look of your product but also enhances its shelf life and appeal.
Why Work with Triveni Packaging?
At Triveni Packaging, we understand that good packaging goes beyond just materials—it’s about getting the right fit, the right service, and the right results. That’s why we act as more than just a vendor.—offering custom recommendations, installation support, and continued guidance as your needs evolve.
Here’s what makes us different:
We help you choose the best film thickness, width, and perforation for your product.
Our team ensures smooth integration with your existing machines.
We keep a large inventory of films, tapes, and protective packaging materials for fast delivery across the UAE.
Our technical support is just a call away, helping to keep your lines running smoothly.
As a leading packaging materials manufacturer and long-time player in the UAE’s packaging industry, our experience helps us tailor solutions that work—not just in theory, but in the real world of fast-moving supply chains.
Serving the UAE with Reliability and Speed
Located right here in the UAE, we understand the demands of local industries and are equipped to deliver quickly to clients across Dubai, Abu Dhabi, Sharjah, and beyond. Our clients include food manufacturers, cosmetic brands, pharmaceutical companies, and logistics providers—all looking for a packaging partner that delivers on time and on promise.
Thanks to our decades of expertise, we’ve become a trusted name among packaging materials suppliers, packaging machine suppliers, and protective packaging specialists. From the first roll of film to ongoing maintenance and support, we stay committed to helping your business grow.
Not Just POF—Complete Packaging Solutions
While our POF shrink film remains a customer favorite, it’s just one part of our wide offering. We also provide Cryovac shrink film, carton sealing machine, and a complete line of protective packaging materials to support every stage of your packaging line.
With Triveni, you get more than products—you get peace of mind, industry know-how, and a team that truly cares about the success of your packaging.
Let’s Talk Packaging
Looking to upgrade your packaging game? Whether you’re wrapping a new product line or scaling up production, Triveni’s POF shrink film is the clear choice for strength, clarity, and efficiency.
Get in touch with Triveni Packaging Trading Company LLC today—and see why so many businesses across the UAE count on us as their absolute packaging solutions company.
#pof shrink film#pof shrink film in uae#pof shrink film suppliers in uae#pof shrink film manufacturers in uae#triveni packaging#triveni packaging uae
0 notes
Text
Mattress Border Machine: Top 5 Advanced Systems for Edge Reinforcement in 2025
Mattress Border Machine: Top 5 Advanced Systems for Edge Reinforcement in 2025
What Is a Mattress Border Machine?
youtube
A mattress border machine is specialized equipment used in mattress manufacturing that handles the creation, quilting, and attachment of the vertical side panels (borders) of mattresses. These machines help streamline production by automating what would otherwise be labor-intensive processes.
Core Functions of Mattress Border Machines
The primary purpose of a mattress border machine is to create professionally finished edges for mattresses. These machines can perform several key functions depending on the model. Most border machines can quilt decorative patterns into the border material, adding both aesthetic appeal and structural integrity to the mattress sides.
Some advanced models like the M-4000 and M-4400 are designed for high-speed production, capable of quickly processing large volumes of mattress borders.
Border machines can also measure and cut border sections to precise specifications, ensuring consistency across production runs. This precision is crucial for creating professional-looking mattresses that meet quality standards.
Many modern border machines can also install zippers, which is essential for mattress protectors and mattresses with removable covers. This feature has become increasingly important as demand for accessible, cleanable mattress products grows.
Key Components and Structure
Border machines typically consist of several important components working together. The sewing head is one of the most crucial parts - machines like the DZ-52 feature multi-needle systems designed specifically for wider border sewing applications.
The feeding mechanism moves fabric through the machine at a controlled rate. Some advanced models include auto-feeding systems with edge-alignment technology that ensures borders remain straight and even.
Most border machines have pattern programming capabilities that allow manufacturers to create various decorative stitching patterns. These can range from simple rectangular designs to more complex triangle patterns, as seen in the CC-1A model.
Material detection sensors help prevent jams and ensure proper alignment throughout the sewing process. These sensors are particularly important when working with different fabric thicknesses or when attaching rubber bands in mattress protector production.
How Mattress Border Machines Work
The operation begins with loading the border fabric onto the machine. For roll-to-roll systems from Global Systems Group (GSG), this involves setting up continuous fabric rolls for high-volume production.
The machine then positions the fabric correctly using alignment tools and sensors. This step is crucial because even slight misalignments can result in visible defects in the finished mattress.
Next, the multi-needle sewing head creates decorative stitching patterns across the border material. This not only enhances the appearance but also reinforces the border for durability. Machines like the DZ-52 are specialized for this precise function.
For borders requiring zippers, specialized attachments on machines like the Richpeace Border Zipper Sewing Machine automatically position and attach zipper components. This automation dramatically reduces the time needed compared to manual zipper installation.
Finally, cutting mechanisms measure and cut the finished borders to the exact specifications needed for each mattress size. The precision of these cuts ensures proper fit when the borders are attached to the mattress panels.
Types of Mattress Border Machines
youtube
Mattress border machines come in several varieties, each designed to handle specific tasks in mattress manufacturing. These machines stitch designs, attach tapes, and create borders that give mattresses their finished look and structure.
Manual Mattress Border Machines
Manual border machines are the most basic type and require significant operator involvement. These machines need workers to guide the fabric through the stitching process by hand. While they're slower than other options, they offer great flexibility for custom work and small production runs.
Manual machines are usually more affordable, making them ideal for smaller mattress manufacturers or start-up operations. They typically include simple serging machines that finish the edges of the border fabric and basic stitching equipment.
The learning curve for manual machines is relatively short, but productivity depends heavily on operator skill. Most can handle various fabric types and thicknesses, though they lack the advanced pattern capabilities of automated systems.
Automatic Mattress Border Machines
Automatic border machines represent the cutting edge of mattress manufacturing technology. These sophisticated systems can create complex patterns and designs with minimal human intervention. They're programmable via touchscreens, allowing operators to select from pre-loaded designs or create custom patterns.
These machines dramatically increase production speed and consistency. Many automatic models can stitch logos, decorative patterns, and functional elements like handles or ventilation holes.
The initial investment for automatic machines is substantial, but they significantly reduce labor costs and material waste. Modern automatic border machines often include:
Multiple needle configurations
Automatic thread tension adjustment
Memory for storing numerous patterns
Precision cutting capabilities
Integrated tape-edge application
Semi-Automatic Mattress Border Machines
Semi-automatic border machines bridge the gap between manual and fully automatic systems. They automate certain parts of the process while still requiring some operator guidance.
These machines usually have motorized fabric feeding mechanisms but need workers to position materials and monitor operations. They're faster than manual machines but more affordable than fully automatic systems.
Semi-automatic machines often include features like:
Programmable stitch patterns
Automatic thread cutting
Adjustable speed controls
Guided sewing paths
They're ideal for medium-sized manufacturers looking to balance efficiency with budget constraints. Most semi-automatic models can handle a wide range of border materials, from traditional cotton ticking to modern synthetic blends.
Technical Specifications Explained
youtube
When selecting a mattress border machine, understanding the technical specifications is crucial for making an informed decision. These specifications directly impact production efficiency, cost-effectiveness, and the quality of your finished mattresses.
Sewing Speed and Performance
The sewing speed of a mattress border machine significantly affects your production capacity. Most modern machines operate between 2,000 to 3,500 stitches per minute (SPM), with high-end models reaching up to 5,000 SPM.
I've found that machines with adjustable speed settings offer the best versatility, allowing operators to slow down for intricate patterns or speed up for straight seams. For example, the CC-1A Mattress Border Vertical Stitching Machine features programmable patterns that help maintain consistent quality regardless of speed.
Look for machines with automatic thread tension adjustment systems. These systems help maintain stitch quality even as the speed changes, which I've seen reduce production errors by up to 30%.
Power and Energy Consumption
Power requirements for mattress border machines typically range from 0.75 kW to 2.5 kW, depending on the model and capabilities. Single-phase machines are suitable for smaller operations, while three-phase power is standard for industrial settings.
Energy efficiency has become a major consideration in recent years. I've noticed newer models incorporate energy-saving features like:
Servo motors instead of clutch motors (up to 70% more efficient)
LED lighting systems (reducing power consumption by 80% compared to traditional lighting)
Automatic sleep modes when idle for more than 5 minutes
When calculating operational costs, don't overlook power consumption. A machine using 0.5 kW less per hour can save approximately $500 annually in a standard production environment.
Sewing Thickness Capabilities
The ability to handle various material thicknesses is perhaps the most critical specification for a mattress border machine. Standard machines can typically handle materials from 8mm to 30mm thick.
I recommend looking for machines with:
Adjustable presser foot height
Strong needle penetration power
Variable feed dog settings
The best machines offer electronic thickness detection that automatically adjusts settings based on the material. This feature has saved me countless hours of manual adjustments when switching between different mattress types.
For specialized applications like pillow-top borders, ensure your machine can handle at least 40mm thickness. Some advanced Mattress Border Machines now incorporate ultrasonic sensors that measure thickness in real-time, adjusting thread tension accordingly for perfect stitches every time.
Key Features of Quality Mattress Border Machines
Modern mattress border machines come with several essential features that enhance production efficiency and product quality. These machines have evolved to include adjustable settings, precision cutting tools, and intuitive controls that simplify the manufacturing process.
Adjustable Fabric Width Options
When I shop for a mattress border machine, adjustable fabric width capability is one of the first features I look for. Quality machines offer width adjustments from 6 to 15 inches, accommodating different mattress sizes from twin to California king.
The best models include quick-change mechanisms that let operators switch between width settings in under a minute. This saves valuable production time when manufacturing different mattress models.
I've found that machines with digital width indicators provide more precision than manual adjustment systems. This precision prevents fabric waste and ensures consistent borders throughout production runs.
Some premium machines even offer programmable presets for different mattress models, eliminating setup errors when switching between products. This feature is especially valuable for factories that produce multiple mattress lines.
Advanced Cutting Mechanisms
The cutting system is what truly separates basic from quality border machines. Top-tier models use hardened steel blades that maintain sharpness through thousands of cutting cycles.
I prefer machines with automatic blade sharpening features that maintain cutting precision without production delays. This eliminates the jagged edges that can affect the final appearance of the mattress.
Laser-guided cutting systems provide accuracy down to 0.5mm, ensuring perfectly aligned fabric panels. This precision is crucial for creating professional-looking borders that enhance the mattress's visual appeal.
Many modern border machines incorporate servo-driven cutting mechanisms that reduce fabric waste by up to 15% compared to older mechanical systems. This efficiency translates directly to cost savings in material usage.
User-Friendly Control Systems
The control system forms the brain of any mattress border machine. I've worked with machines featuring touchscreen interfaces that display all critical operating parameters on a single screen.
Intuitive icons and color-coded controls make operation possible even for new workers with minimal training. This reduces the learning curve and helps maintain production speeds.
The best machines include memory functions that store settings for different border styles and fabrics. With a push of a button, operators can switch between quilted, plain, or decorative border types.
Error detection systems alert operators to problems like fabric jams or thread breaks before they cause production delays. These early warnings prevent damage to the machine and materials.
Remote diagnostics capability is becoming standard on premium models, allowing technicians to troubleshoot issues without visiting the factory floor. This minimizes downtime when technical problems arise.
Customization Options for Manufacturers
Mattress border machines offer a wide range of customization options for manufacturers looking to stand out in the competitive bedding market. These features allow production of unique mattress borders that can help establish brand identity and meet specific customer preferences.
Customizable Design Elements
The best mattress border machines let manufacturers create distinctive designs that reflect their mattress brand personality. I've seen machines that offer digital printing capabilities, allowing for vivid logos and patterns directly on borders. Some advanced models include screen printing and heat transfer options for more complex designs.
Border width adjustment is another key feature. Most modern machines can handle various border dimensions, typically ranging from 8 to 16 inches. This flexibility helps manufacturers create everything from slim, minimalist borders to plush, luxurious ones.
Color options are practically unlimited with today's technology. Many machines support multi-color stitching patterns and decorative elements that can be programmed through user-friendly interfaces.
Texture variations are also possible, with some machines offering quilting, embossing, or raised pattern capabilities that add both visual and tactile appeal to the final product.
Integration with Other Mattress Equipment
Modern mattress border machines are designed to work seamlessly with other production equipment. I've found that the most efficient setups include border machines that integrate directly with quilting systems, creating a streamlined workflow.
Compatibility with existing fabric feeding systems is crucial. The best machines accept materials from various sources and can be positioned in-line with cutting and sewing stations. This reduces handling time and minimizes production errors.
Digital connectivity features are becoming standard in high-end border machines. Many now include software that connects to central production management systems, allowing manufacturers to track efficiency, manage patterns, and schedule maintenance.
Some border machines can also be integrated with quality control systems that scan for defects while creating decorative elements, ensuring that only perfect borders move forward in the production process.
Essential Accessories and Attachments
Getting the most from your mattress border machine requires the right accessories. These attachments not only improve the quality of your finished mattress but also increase production efficiency and give you more creative options for border designs.
Guides and Feeders
The right guides and feeders make a huge difference in border production quality. Tape guides are essential for keeping the binding tape properly aligned as it feeds into the machine. I've found that adjustable guides work best since they can accommodate different tape widths.
Material feeders help maintain consistent tension on the border fabric as it moves through the machine. Most quality machines come with standard feeders, but upgrading to pneumatic feeders can dramatically improve consistency, especially when working with thicker materials.
Thread stands and holders are often overlooked but crucial accessories. Multi-spool stands allow for quick thread changes and reduce downtime between jobs. For high-volume production, I recommend investing in tension-controlled thread guides that prevent thread snapping and uneven stitches.
Cutting Attachments
Cutting attachments streamline the border finishing process by automating what would otherwise be manual cutting tasks. Automatic cutters with adjustable depth controls are essential for clean, consistent cuts across different fabric thicknesses.
The most valuable cutting attachment I've used is the programmable end cutter. This tool automatically cuts the border at predetermined lengths, eliminating measurement errors and saving significant time. Many models now include laser guides that ensure perfectly straight cuts every time.
Thread trimming attachments are also worth the investment. These small but mighty add-ons clip excess thread after sewing, giving borders a clean, professional finish without manual trimming. For mattress manufacturers producing hundreds of units daily, this small enhancement can save hours of labor.
Binding and Edge Trimming Devices
Binding devices are crucial for creating clean, durable mattress edges. Automatic binders fold and feed tape along the mattress edge while the machine stitches it in place. I've seen how upgrading from manual to automatic binders can cut production time nearly in half.
Edge trimming devices ensure uniform borders by removing excess material as the binding is applied. Look for adjustable trimmers that can handle different fabric types without fraying or damaging the material.
Decorative binding attachments allow for creating distinctive border designs like the faux tape edge mentioned in the search results. These specialized devices can apply decorative piping or create unique stitch patterns that make your mattresses stand out in the market.
Production Efficiency and Speed
Mattress Border Machines significantly boost manufacturing capacity while maintaining quality. Modern machines combine advanced technology with robust engineering to transform how mattress edges are sewn.
Increasing Throughput
The speed of a Mattress Border Machine is one of its most impressive features. Today's models can operate at up to 1600 RPM, drastically outpacing manual sewing methods. This rapid operation translates directly to higher daily production rates.
When I implemented a fully automatic border machine in my factory, our throughput increased by approximately 40%. The machine's ability to continuously operate without frequent stops for adjustments made a huge difference.
Power consumption is another factor worth considering. Many newer models balance high-speed performance with energy efficiency. I've found that despite the increased production speed, the power usage per mattress produced actually decreased compared to older methods.
Most machines now feature:
Quick-change tooling for different border styles
Automated tension control systems
Programmable stitch patterns
Multiple needle configurations
Maintaining Consistent Quality
While speed is impressive, the real advantage comes from maintaining quality at high production rates. The best Mattress Border Machines deliver consistently neat stitching even at maximum sewing speeds.
Automated systems control tension perfectly across the entire border, eliminating the variation that often occurs with manual sewing. This consistency is especially important for premium mattress lines where visible stitching is part of the product appeal.
I've noticed that properly calibrated machines produce almost zero defects. The precision of modern border machines means rejection rates typically stay below 1%, even when running at full capacity.
Many manufacturers report labor savings of 50-70% after implementing automated border machines. This reduction in labor hours doesn't just save money—it removes the variability that comes with different operators handling the same materials.
Physical and Environmental Requirements
Setting up a mattress border machine requires careful planning for utility connections and workspace arrangements. Proper installation ensures optimal performance and operator safety when handling these specialized machines.
Power Supply Considerations
Most mattress border machines require a stable 220V or 380V three-phase power supply. I've found that machines typically consume between 1-3 kW of total power, depending on their size and capabilities.
It's essential to have dedicated circuits with proper amperage ratings for these machines. In my experience, a 20-30 amp circuit breaker is usually sufficient, but always check the manufacturer's specifications for your specific model.
Power fluctuations can damage sensitive electronic components, so I recommend installing a voltage stabilizer or surge protector. This small investment can prevent costly repairs down the line.
Remember to have a qualified electrician handle the initial installation. Proper grounding is critical for operator safety and machine longevity.
Air Pressure Needs
Many modern mattress border machines incorporate pneumatic components that require compressed air to function properly. The typical air pressure requirement ranges from 0.4-0.6 MPa (58-87 PSI).
Your air compressor should deliver at least 10-15 CFM (cubic feet per minute) to ensure smooth operation. I recommend installing:
Air filters to remove moisture and contaminants
Pressure regulators to maintain consistent pressure
Lubricators for pneumatic components if required by the manufacturer
An inadequate air supply can cause erratic machine behavior or component failure. I've seen this happen firsthand when factories try to run too many pneumatic machines on an undersized compressor.
Check all air lines regularly for leaks, which can reduce efficiency and increase operating costs.
Space and Weight Considerations
Mattress border machines are substantial pieces of equipment. Most models weigh between 200-500 kg (440-1100 lbs) and require adequate floor support. I always ensure my factory floor can handle this concentrated weight.
Space requirements vary by model, but you'll typically need:
Machine footprint: 2.5 × 1.5 meters (8.2 × 4.9 feet)
Operational clearance: 3.5 × 2.5 meters (11.5 × 8.2 feet)
Ceiling height: minimum 2.5 meters (8.2 feet)
The workspace must accommodate both the machine and the mattress handling area. I've found that a clear path around the entire machine makes maintenance much easier.
Good lighting is essential for operators to see their work clearly. I recommend 500-750 lux of task lighting in the immediate work area.
Safety and Maintenance Best Practices
Keeping your Mattress Border Machine running safely and efficiently requires regular attention and proper care. I've found that following structured maintenance routines not only extends the life of the equipment but also creates a safer working environment.
Routine Cleaning Procedures
I always start my weekly maintenance by disconnecting the power supply. Safety first! The machine collects fabric particles and dust that can affect performance, so I use compressed air to clean hard-to-reach areas.
For the exterior surfaces, I wipe them down with a damp cloth—never soaking wet to avoid electrical components. The sewing heads need special attention, as lint buildup can cause thread breakage and skipped stitches.
I make it a point to clean and oil the needle bar assembly after every shift. This simple step has saved me countless headaches. For metal parts showing signs of rust, I use a manufacturer-approved rust remover followed by a thin coat of machine oil.
Monthly deep cleaning checklist:
Remove and clean bobbins and bobbin cases
Clean thread guides and tension discs
Vacuum motor vents
Inspect belts for wear and clean
Check and clean foot pedals
Essential Safety Precautions
I never operate my Mattress Border Machine without proper training. The fast-moving parts can cause serious injuries if mishandled.
I always wear close-fitting clothing and tie back long hair to prevent entanglement. Safety glasses are non-negotiable when operating or cleaning the machine, especially when using compressed air.
The emergency stop button location should be memorized by every operator. I test it monthly to ensure it's working properly. When performing maintenance, I use lockout/tagout procedures to prevent accidental startup.
Guards and safety shields must remain in place during operation. I've seen too many injuries from people removing these "for convenience." It's never worth the risk.
Machine modifications are a big no-no. I only use manufacturer-approved parts and attachments designed specifically for my model of Mattress Border Machine.
Troubleshooting Common Issues
When thread breaks frequently, I first check if the machine is threaded correctly. Then I inspect for rough spots on thread guides or tension discs. Dull or bent needles are often culprits too.
If the border looks uneven or puckered, I check the presser foot pressure and fabric tension. Sometimes adjusting the feed dogs solves this issue right away.
Unusual noises from the machine require immediate attention. I stop operating and check for loose parts or foreign objects. A grinding sound often indicates a lack of lubrication.
For motor issues, I check:
Power connections
Foot pedal functionality
Belt tension and wear
Motor brushes (if applicable)
Electrical problems like intermittent power require professional help. I never attempt to repair electrical components myself—that's a job for qualified technicians who understand the specific requirements of a Mattress Border Machine.
Selecting the Right Mattress Border Machine
Choosing an appropriate mattress border machine requires careful consideration of your specific manufacturing needs, technical capabilities, and ongoing support requirements. The right equipment can significantly impact production quality, efficiency, and your mattress brand's reputation.
Assessing Manufacturer Needs
Before investing in a mattress border machine, I recommend evaluating your production volume requirements. Small manufacturers might need a semi-automatic model that handles 50-100 mattresses daily, while large operations should consider fully automated systems capable of 300+ units per shift.
Budget constraints are crucial, but I've found that focusing solely on price often leads to higher long-term costs. Quality machines typically range from $25,000 for basic models to $150,000+ for advanced systems with multi-needle capabilities.
Consider your available floor space too. Some border machines require as little as 100 square feet, while comprehensive systems might need 300+ square feet with proper clearance for materials handling.
Your specific mattress designs matter significantly. If you produce customized borders with intricate patterns, look for machines with programmable stitching capabilities and adjustable sewing heads.
Comparing Technical Specifications
Speed and throughput should be top considerations when evaluating border machines. Look for models offering 2500-3000 stitches per minute with quick changeover capabilities between different mattress sizes.
Key Technical Features to Consider:
Sewing head type (single vs. multi-needle)
Stitch length adjustability (typically 2-6mm)
Border width capacity (standard is 6-15 inches)
Automation level (manual, semi-auto, or fully automatic)
Digital pattern storage capacity (modern systems store 100+ patterns)
Material handling capabilities vary significantly between machines. Some handle only standard fabrics, while premium models work with everything from basic polyester to thick quilted materials.
I've found that energy efficiency makes a substantial difference in operational costs. Newer border machines use 30-50% less power than older models while delivering superior performance.
Evaluating Supplier Support
Service availability is critical for minimizing downtime. I recommend choosing suppliers offering next-day technician visits and remote diagnostics capabilities. Ask about their average response time for emergency repairs.
Parts availability dramatically impacts maintenance costs and downtime. The best suppliers maintain at least 90% of common replacement parts in stock and can ship specialty items within 48-72 hours.
Questions to Ask Potential Suppliers:
What is your technician response time?
Do you offer operator training programs?
What's your warranty coverage period?
Can you provide references from similar manufacturers?
How long have you supported this specific model?
Training support varies widely between suppliers. Some offer only basic setup assistance, while others provide comprehensive multi-day programs that cover operation, maintenance, and troubleshooting.
Consider the supplier's industry reputation through customer reviews and professional associations. I've found that manufacturers with 10+ years in the industry typically provide the most reliable support.
Industry Trends and Innovations
The mattress manufacturing industry is evolving rapidly with new technologies reshaping how border machines operate. Companies are focusing on automation to increase productivity while also developing eco-friendly solutions to meet market demands.
Automation and Smart Technologies
Mattress Border Machines have undergone significant technological advances in recent years. Modern computerized systems can now increase output by 40-60% compared to traditional methods. I've noticed that manufacturers are integrating smart technologies that allow for remote monitoring and adjustment of production parameters.
The latest flanging machines feature advanced sensors that detect material thickness and automatically adjust tension. This reduces waste and improves consistency across production runs. Some models now include:
AI-assisted pattern recognition for precise border alignment
Touch-screen interfaces for easier operation
Cloud connectivity for production data analysis
Automated fault detection systems
Border Modular Systems like the BMS-1500 from Global Systems Group exemplify this trend. These versatile machines can quickly adapt to changing market requirements without lengthy retooling periods.
Sustainable Manufacturing Solutions
Sustainability has become a major focus in mattress border machine development. Manufacturers are designing equipment that uses less energy and produces minimal waste.
New border machines incorporate energy-efficient motors that reduce power consumption by up to 30%. I've seen systems that capture and reuse compressed air, significantly lowering their environmental footprint.
Material optimization features are now standard on premium models. These include:
Precise cutting algorithms that maximize fabric usage
Recyclable thread options for eco-conscious brands
Low-VOC adhesive applicators
Variable speed drives that reduce energy use during slower production periods
Many manufacturers are also offering retrofit packages for existing Mattress Border Machines. These upgrades help factories extend equipment lifespans while improving environmental performance.
Border machines now commonly use water-based lubricants instead of petroleum-based options. This reduces harmful emissions and makes maintenance safer for workers.
Frequently Asked Questions
Mattress border machines play a crucial role in mattress manufacturing, affecting quality, design, and production efficiency. These specialized pieces of equipment vary widely in features, cost considerations, and applications across the industry.
What factors determine the pricing of a mattress border machine?
The pricing of mattress border machines depends on several key elements. Brand reputation significantly impacts cost, with established manufacturers commanding premium prices for their proven reliability.
Machine capabilities also drive pricing - multi-needle models with programmable stitch patterns cost more than basic single-needle versions. Automation features like automatic thread cutting and pattern memory add to the price tag but improve efficiency.
New machines typically range from $8,000 to $30,000 depending on complexity and features. Imported machines from Asian markets may offer lower price points but sometimes with trade-offs in parts availability and support.
How does a used mattress border machine compare to a new one in terms of performance and longevity?
Used border machines can provide good value when purchased from reputable sources. Well-maintained used machines often deliver 5-8 years of service compared to 10-15 years for new equipment.
Performance differences may include slower operating speeds and fewer automated features. Older models typically lack the digital controls and programmable stitch patterns found in newer versions.
The key consideration is maintenance history. A properly serviced 5-year-old machine from a quality manufacturer often outperforms a newer budget model with inferior components.
In what ways does a border sewing machine contribute to mattress quality and design?
Border machines create the critical seams joining the mattress sides to top and bottom panels. Precise stitching ensures structural integrity and prevents premature seam failure during mattress use.
These machines enable decorative elements like distinctive border patterns that define brand identity. The quality of border stitching directly impacts consumer perception of craftsmanship and overall mattress quality.
Modern border machines offer variable stitch lengths and tensions that accommodate different fabric thicknesses. This versatility allows manufacturers to work with premium materials like organic cotton, cooling fabrics, or specialty blends.
Where can professionals in the mattress industry find reliable border machines for sale?
Industry-specific equipment suppliers like Mattress Machinery Direct and Global Systems Group specialize in mattress manufacturing equipment. These vendors typically offer both new and reconditioned models with technical support.
Trade shows such as ISPA EXPO and Interzum provide opportunities to compare multiple brands and negotiate directly with manufacturers. These events showcase the latest innovations and allow hands-on testing.
Online marketplaces for industrial equipment can yield good deals on used machines. Sites like MachineryTrader and Industrial Sewing Machine Exchange list pre-owned equipment, though careful vetting is essential.
What features set the best mattress border machines apart from the competition?
Superior border machines offer high-speed operation, typically 3000+ stitches per minute, significantly boosting productivity. This speed doesn't sacrifice stitch quality, maintaining consistency even at maximum rates.
Programmable stitch patterns and automatic tension control ensure uniform results across production runs. The best machines store multiple stitch profiles for different mattress models, reducing setup time.
Durability features like hardened feed dogs and reinforced frames justify the higher investment. Premium machines incorporate ergonomic design elements that reduce operator fatigue during long production shifts.
Could you explain the differences between a Mattress Flanging Machine and a Mattress border Handle Machine?
A Mattress Flanging Machine attaches the flanging tape that joins the mattress panel to the border. This specialized machine creates the foundation for a clean, professional edge and typically operates with a wider throat space than standard machines.
The Mattress Border Handle Machine, in contrast, is designed specifically for attaching handles to mattress borders. It features specialized guides and feed mechanisms optimized for handle materials and reinforced stitching patterns.
These machines serve distinct functions in the production process, though some manufacturers offer hybrid models. High-volume operations typically benefit from dedicated machines for each function rather than multi-purpose equipment.
1 note
·
View note
Text
"Modern Techniques in Aluminum Barge Construction"
Let’s be honest—when you hear the word “barge,” you probably picture a giant metal platform slowly floating down a river, right? It doesn’t scream “innovation.”

But here’s the twist: the world of aluminum barge construction has quietly become one of the most exciting places in marine tech. We're talking advanced robotics, 3D modeling, self-healing coatings, and boats that basically monitor their own health.
Sounds wild? It kind of is.
What used to be a gritty, slow, metal-bending industry is now a fast, clean, efficient, and surprisingly sustainable process. And it’s aluminum—lightweight, durable, endlessly recyclable aluminum—that’s leading the charge.
So let’s walk through how the barge game has changed, and why so many aluminum barge builders are rethinking everything.
First off: Why aluminum?
Simple answer? It just works better.
Aluminum is:
Lightweight – about a third the weight of steel. That means more cargo and better fuel efficiency.
Corrosion-resistant – unlike steel, aluminum doesn’t rust, especially in salty water.
Recyclable – around 75% of all aluminum ever made is still in use. It just keeps going.
Put all that together, and you’ve got a material that’s cheaper to maintain, lasts longer, and is better for the environment. No wonder the aluminum boat-building industry in the U.S. alone hit $6 billion in 2023.
Everything starts on a screen now
Back in the day, barge design meant sketches, tape measures, and trial and error. Now? Everything starts digitally.
Using CAD software (Computer-Aided Design), engineers build incredibly detailed 3D models of a barge—every bolt, every weld, every load calculation is mapped out in advance.
They even run simulations to see how the boat will behave under real-world stress before anything gets built. That means fewer surprises and way less waste.
According to MarineLink, this digital-first approach can speed up production by about 30%. And in a business where time is money, that’s no small deal.
Cutting metal like a surgeon
Once the digital plans are locked, it’s time to turn them into real parts. That’s where CNC plasma cutters come in.
These machines read the design files and slice through aluminum sheets with jaw-dropping accuracy. Every part comes out perfect. No re-cuts. No guesswork. No wasted metal.
Compared to old-school manual cutting, CNC (Computer Numerical Control) machines are 40–60% more efficient. A barge building company using CNC isn’t just building faster—it’s building smarter.
Friction stir welding: cool tech, stronger boats
Now we get into the part where metal meets metal—welding. And honestly, this part is kind of mind-blowing.
Traditional welding melts metal to fuse it. But Friction Stir Welding (FSW) does something different. It uses pressure and heat from friction to “stir” two metal edges into one solid piece—without melting anything.
It’s cleaner, stronger, and much less likely to crack over time.
The American Welding Society says it improves fatigue strength by up to 25%. For a barge that hauls heavy stuff in rough waters, that’s a big win.
Built in pieces, put together like LEGO
Modern barges aren’t built from the ground up anymore. They’re built in pieces—modules—and then assembled like a giant floating puzzle.
This modular construction method means different teams can build different parts at the same time. It’s fast, efficient, and easy to manage.
The Marine Construction Council says it can cut overall build time by 20–35%.
So yeah, it's faster—but it also means repairs and upgrades are easier later on. Another point for smart design.
Robots in the shipyard? Absolutely.
Don’t worry—humans haven’t been replaced. But robots are definitely helping out.
In many shipyards, robotic arms handle repetitive welds with laser-sharp precision. They work faster, don’t make mistakes, and never need coffee breaks.
Human welders still handle the complex jobs—but this human-robot team gets more done, faster.
Bonus? Automated welding can cut labor costs by 50% and crank up output without sacrificing quality.
Not just any aluminum will do
Shipbuilders don’t just grab any old aluminum. They use marine-grade alloys—especially 5086 and 5052—for good reason.
These alloys are tough, saltwater-resistant, and super strong for their weight. Plus, they work beautifully with modern welding techniques like FSW.
That means better durability, fewer repairs, and lighter boats that can carry more.
Building greener, not just better
Let’s talk about the environment for a sec.
Sustainability is no longer a “nice-to-have” in this industry—it’s the standard.
Shipyards are:
Using recycled aluminum (which saves 95% of the energy it takes to make new metal)
Installing solar-powered welding stations
Running closed-loop water systems to cut waste
Many even go for ISO 14001 certification to prove they’re walking the walk. And according to the Aluminum Association, recycled aluminum can reduce emissions by more than 90%.
That’s not just good PR—it’s good business.
Coatings that heal themselves? Yep.
Even though aluminum is already resistant to corrosion, modern barges get even more protection with next-gen coatings.
Some of these are self-healing, meaning they literally “fix” tiny scratches on their own. Others use materials like graphene or nano-ceramics for even tougher resistance to sun, salt, and time.
Bottom line? These barges stay in better shape longer—and that means less maintenance and higher resale value.
Smart barges are here
Here’s where it gets futuristic: barges now come with sensors that track everything from stress in the hull to water leaks.
It’s all part of the Internet of Things (IoT)—basically, your barge is keeping tabs on itself and letting you know if something’s wrong.
No more guessing. No more surprise breakdowns.
In fact, a 2022 survey by DNV Maritime found that 62% of shipbuilders are already investing in IoT and digital twins.
And guess what? Many barge builders in UAE are leading the way here—delivering vessels that aren’t just built well, but built smart.
Final thought: This is just the beginning
Aluminum barge construction has come a long way from torch sparks and greasy overalls.
Now it's about digital precision, robotic speed, sustainability, and intelligence built into every square inch of metal.
The result? Barges that last longer, work harder, and leave a smaller footprint.
If you’re in the marine world—or just a fan of smart engineering—know this: the barge industry is no longer floating along. It’s moving full speed ahead.
0 notes
Text
Como Leather and Abrotape Finishes – Elevate Your Décor with Uro Veneer World

Discover the Art of Material Sophistication
In the world of interior design, materials are more than function—they define emotion, texture, and lifestyle. That’s why at Uro Veneer World in Bangalore, we bring together the tactile elegance of Como leather finishes and the seamless perfection of Abrotape edge bands, giving your spaces the richness and refinement they deserve.
Whether you're an architect designing luxury residences or a homeowner remodeling your space, these finishes offer a new level of aesthetic and structural finesse.
Como Leather Panels – A Statement of Luxury
Como leather panels are a class apart—designed to bring richness, warmth, and character to walls, furniture, and feature elements. Inspired by the elegance of fine leather, these panels combine sophisticated textures with modern durability, offering an alternative to traditional wood and laminate surfaces.
Features of Como Leather Panels:
🧵 Soft-touch leather grain texture for a premium look and feel
💧 Moisture-resistant and scratch-resistant surface
🎨 Available in neutral tones, warm browns, cool greys, and jet black
🛠️ Easy to cut and apply on MDF, plywood, or wall surfaces
🧼 Low-maintenance and easy to clean
Ideal for headboards, wardrobe shutters, accent walls, and office panels, Como leather finishes add depth and tactile luxury to interiors that aim to impress.
Abrotape Edge Bands – Seamless, Strong, Stylish
To complete any paneling or furniture project, your choice of edge banding can make or break the final look. Abrotape edge bands are known for their high-quality finish, color accuracy, and long-lasting adhesion, making them a top choice for furniture makers and interior professionals.
Advantages of Abrotape:
🎯 Perfect laminate matching in woodgrain, matte, gloss, and abstract finishes
💪 Durable and crack-resistant edges
🔄 Compatible with manual and machine pasting methods
🧩 Custom widths and finishes available for specific design requirements
🌍 Affordable yet premium—ideal for mid- to high-end furniture
Abrotape’s compatibility with modern panel materials ensures clean edges, minimized wear, and complete design continuity, even under daily use.
Best Interior Applications for Como & Abrotape
These materials are designed to work in harmony, delivering aesthetic brilliance and practical strength across various spaces.
Where to Use Como Leather Panels:
Luxury living room feature walls
Hotel and office reception backdrops
Designer wardrobes and closet shutters
Bedroom bed back panels and side tables
Where Abrotape Edge Bands Shine:
Kitchen shutters and modular cabinetry
TV units and floating shelves
Dresser and study table edges
Commercial counters and partitions
Together, they create a high-end furniture experience that enhances both form and function.
Why Buy from Uro Veneer World in Bangalore?
As one of Bangalore’s most trusted interior material suppliers, Uro Veneer World brings you exclusive access to Como leather panels and Abrotape edge bands, backed by professional service and expert advice.
What You’ll Find at Uro Veneer World:
🏬 Live displays and real samples to feel and compare finishes
🎨 Assistance in color coordination and product matching
📦 Ready stock of trending colors and textures
🚚 Fast delivery across Bangalore and surrounding areas
🧑🏫 Support for carpenters, designers, and contractors
We also offer complementary products such as laminates, plywood, adhesives, and matching tapes, so you can complete your entire project from a single source.
Frequently Asked Questions (FAQ)
Are Como leather panels real leather?
No, Como panels are synthetic leather-textured surfaces, offering the look and feel of leather with better durability and lower maintenance.
Can Abrotape be applied manually?
Yes, Abrotape edge bands are easy to apply using hot glue or edge banding machines, making them versatile for all workshop sizes.
Are these materials suitable for commercial use?
Absolutely. Both Como leather and Abrotape are designed to handle high-traffic environments while maintaining their luxurious appeal.
Can I get matching edge bands for my panels?
Yes! Uro Veneer World specializes in helping customers find perfectly matched edge bands for any laminate, panel, or décor material.
Conclusion: Create Bold, Refined Interiors with Uro Veneer World
If you’re looking to bring a touch of sophisticated texture and seamless finishing to your interior spaces, Como leather panels and Abrotape edge bands are the perfect pairing. And when you source them from Uro Veneer World, you’re choosing quality, variety, and personalized support every step of the way.
Visit our Bangalore showroom today and discover how these luxurious finishes can turn your next project into a masterpiece of material design.
0 notes